Server Installation
The NudgeBee Server is the central component of the NudgeBee platform. It receives data from NudgeBee Agents, performs analysis, and handles user authentication and integrates with external services. This is required for self-hosted deployments only.
Cloud SaaS users: You do not need to install the server. It is fully managed for you at app.nudgebee.com. Skip to the Agent Installation.
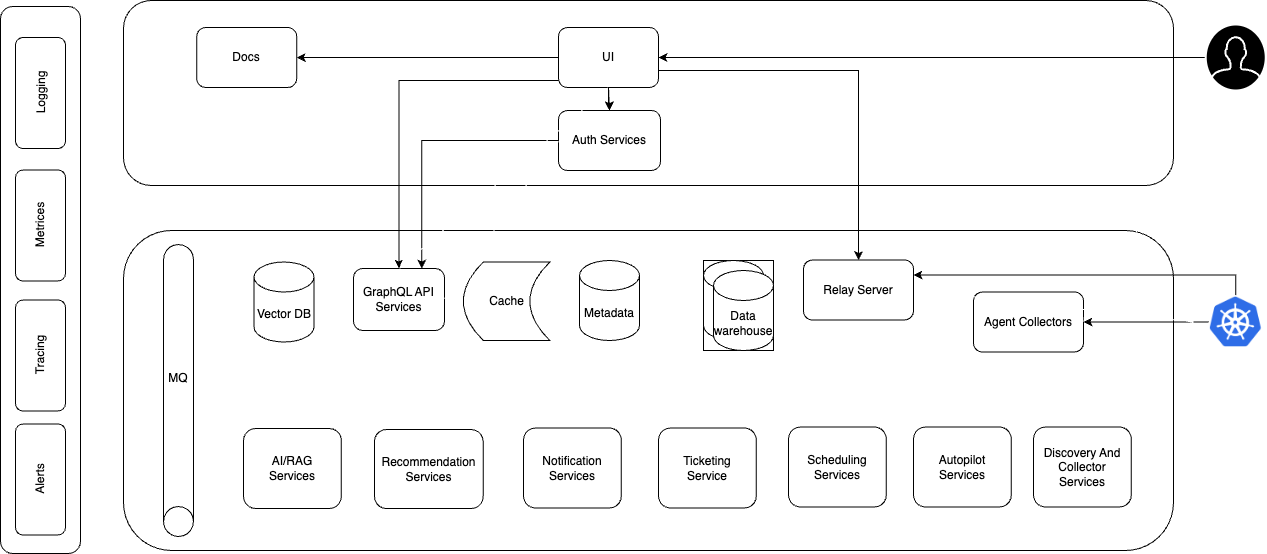
Architecture
Estimated time: 15–30 minutes, depending on your cluster and infrastructure setup.
Watch the Walkthrough
1. Before You Begin
Make sure you have the following ready before starting the installation.
Required
| Requirement | Details | Notes |
|---|---|---|
| Kubernetes cluster | v1.27 or newer, minimum 2 nodes | Each node: 16 GB RAM, 4 cores, 100 GB SSD |
| Helm | v3.x installed and configured | Install Helm if you don't have it |
| NudgeBee License Key | Provided when you sign up for a self-hosted license | Contact NudgeBee support if you don't have one |
| Registry access | Cluster must be able to pull images from registry.nudgebee.com | Or mirror the images to your internal registry for air-gapped environments |
| Persistent Volume | 200 GB available (100 GB if you use an external Postgres) | Required for database and application state |
How much does the server actually use? All NudgeBee server components together consume approximately 12 GB RAM and 4 CPU cores. This includes the bundled Postgres, RabbitMQ, and ClickHouse. If you manage these dependencies externally, the footprint drops to around 8 GB RAM and 2 CPU cores. The 2-node recommendation provides headroom for reliability.
Optional but Recommended
These are not required to get NudgeBee running, but they improve the production experience. You can add all of these after installation.
| Component | What it enables | Default without it |
|---|---|---|
| SSL / DNS / Ingress | Public URL access, Slack apps, webhook triggers, magic link login | Access via kubectl port-forward only |
| External Postgres | Use your own managed database for easier backup and scaling | NudgeBee bundles its own Postgres automatically |
| Email (SMTP) | Daily summary reports and magic link authentication | Users log in via SSO or admin invite only |
| LLM provider | AI-powered troubleshooting, NuBi agent, automated runbooks | Configure after installation — see LLM Integrations |
Network Requirements
Your cluster needs the following network access for the installation and normal operation:
- Outbound to
registry.nudgebee.com— to pull Docker images during installation. - Internal DNS resolution — pods must be able to resolve the
BASE_URLyou configure (used for authentication). - Outbound to external services (if you use them) — Slack, Jira, MS Teams, GitHub, OpenAI, etc. require outbound connectivity from the NudgeBee server.
- Inbound from external services (optional) — if you use bidirectional integrations like Slack apps, Slack needs to reach your NudgeBee server's public URL.
Starting simple? You can skip Ingress, SSL, and external services for now. The minimal installation works with just outbound registry access and internal DNS. Add public access and integrations later.
2. Install NudgeBee
The installation is three steps: log in to the Helm registry, create a values file, and run the Helm install.
Step 1: Log in to the Helm Registry
helm registry login registry.nudgebee.com --username nudgebee --password $NUDGEBEE_LICENSE_KEY
Replace $NUDGEBEE_LICENSE_KEY with your actual license key.
Step 2: Create Your values.yaml
Create a file called values.yaml with the minimum required configuration. This gets NudgeBee running with port-forwarding — the simplest setup that works.
global:
  image:
    registry: "registry.nudgebee.com"
  imagePullSecrets:
    - name: nudgebee-registry-secret

nudgebee_registry_secret:
  enabled: true

nudgebee_secret:
  BASE_URL: "http://localhost:3000"
  NUDGEBEE_LICENSE: <your-license-key>

app:
  ingress:
    enabled: false
k8s-collector:
  ingress:
    enabled: false
relay-server:
  ingress:
    enabled: false
Replace <your-license-key> with your NudgeBee license key.
Step 3: Run the Helm Install
helm upgrade nudgebee oci://registry.nudgebee.com/nudgebee \
  -f values.yaml \
  --install \
  --namespace nudgebee \
  --create-namespace \
  --wait \
  --kube-context $KUBE_CONTEXT
To install a specific version, add --version $CHART_VERSION to the command. See the Server Releases page for available versions.
This minimal setup gets NudgeBee running with port-forwarding. You can add Ingress, SSL, external Postgres, and other configurations later without reinstalling — just update your values.yaml and run helm upgrade again.
3. Verify the Installation
After the Helm install completes, check that all pods are running:
kubectl get pods -n nudgebee
All pods should show Running or Completed status. This typically takes 2–3 minutes after the Helm command finishes.
If pods are stuck in Pending, CrashLoopBackOff, or Error, see the Troubleshooting section below.
4. Access the UI
Without Ingress (Port-Forwarding)
Forward the NudgeBee UI to your local machine:
kubectl port-forward svc/app 3000:80 -n nudgebee --kube-context $KUBE_CONTEXT
Then open http://localhost:3000 in your browser. You should see the NudgeBee login page.
Use the email address associated with your NudgeBee license to log in. The password is auto-generated during installation and stored in a Kubernetes secret.
Retrieve the password by decoding the secret:
kubectl get secret nudgebee -n nudgebee \
  -o jsonpath='{.data.NEXTAUTH_DUMMY_CREDS_PASSWORD}' \
  --kube-context $KUBE_CONTEXT | base64 -d
Use the decoded password along with your license email to sign in.
Security: The dummy credentials provider is intended for initial setup and onboarding. For production environments, it is recommended to configure a proper authentication provider (SSO, LDAP, etc.) and disable dummy credentials. See Authentication Integrations for details.
Relay and Collector URLs for Agent Installation: When you install the NudgeBee Agent later, you will need these internal service URLs:
- Relay Server URL:
ws://relay-server.nudgebee.svc:8080 - Collector Server URL:
http://k8s-collector.nudgebee.svc
With Ingress (Public URL)
If you configured Ingress (see next section), navigate to the URL you set as BASE_URL — for example, https://nudgebee.yourcompany.com.
5. Add Ingress and SSL (Recommended for Production)
The minimal installation above works with port-forwarding, but for production use you should expose NudgeBee via Ingress with SSL. This enables:
- Public URL access for your team (no need to run
kubectl port-forward) - Slack and Google Chat app integrations (they need to reach your server)
- Webhook triggers for the Workflow Builder
- Magic link email authentication
Understanding the Three Endpoints
NudgeBee exposes three services that each need their own Ingress entry:
| Service | Purpose | Example domain |
|---|---|---|
| App | The web UI and API | nudgebee.yourcompany.com |
| Collector | Receives data from agents running in your monitored clusters | collector.yourcompany.com |
| Relay | WebSocket connection for real-time agent communication | relay.yourcompany.com |
Relay and Collector URLs for Agent Installation: When you install agents with Ingress enabled, use:
- Relay Server URL:
wss://relay.yourcompany.com - Collector Server URL:
https://collector.yourcompany.com
Sample Ingress Values File (with SSL)
The following values.yaml uses cert-manager for SSL. Adjust the annotations and TLS settings based on your cluster's ingress controller and certificate management setup.
Replace all <placeholder> values with your actual domains and license key.
global:
  image:
    registry: "registry.nudgebee.com"
  imagePullSecrets:
    - name: nudgebee-registry-secret

nudgebee_registry_secret:
  enabled: true

nudgebee_secret:
  BASE_URL: "<NudgeBee Server Https Url>"       # e.g., https://nudgebee.yourcompany.com
  NUDGEBEE_LICENSE: <your-license-key>
  NEXTAUTH_DUMMY_CREDS_ENABLED: true

app:
  ingress:
    enabled: true
    hosts:
      - host: "<NudgeBee Base Domain>"           # e.g., nudgebee.yourcompany.com
        paths:
          - path: /
            pathType: ImplementationSpecific
    tls:
      - secretName: nudgebee-tls
        hosts:
        - "<NudgeBee Base Domain>"
    annotations:
      cert-manager.io/issuer: cert-letsencrypt-issuer
      nginx.ingress.kubernetes.io/force-ssl-redirect: "true"
      nginx.ingress.kubernetes.io/proxy-buffer-size: '32k'
      nginx.ingress.kubernetes.io/proxy-body-size: "10m"
k8s-collector:
  ingress:
    enabled: true
    hosts:
      - host: "<NudgeBee collector Base Domain>"  # e.g., collector.yourcompany.com
        paths:
          - path: /
            pathType: ImplementationSpecific
    tls:
      - secretName: nudgebee-tls
        hosts:
        - "<NudgeBee Base Domain>"
    annotations:
      cert-manager.io/issuer: cert-letsencrypt-issuer
      nginx.ingress.kubernetes.io/force-ssl-redirect: "true"
      nginx.ingress.kubernetes.io/proxy-body-size: "50m"
relay-server:
  ingress:
    enabled: true
    hosts:
      - host: "<NudgeBee relay Base Domain>"      # e.g., relay.yourcompany.com
        paths:
          - path: /
            pathType: ImplementationSpecific
    tls:
      - secretName: nudgebee-tls
        hosts:
        - "<NudgeBee Base Domain>"
    annotations:
      cert-manager.io/issuer: cert-letsencrypt-issuer
      nginx.ingress.kubernetes.io/force-ssl-redirect: "true"
After updating your values.yaml, apply the changes:
helm upgrade nudgebee oci://registry.nudgebee.com/nudgebee \
  -f values.yaml \
  --install \
  --namespace nudgebee \
  --wait \
  --kube-context $KUBE_CONTEXT
6. Advanced Configuration
These options are for teams that need to customize the installation for production requirements. You can skip this section for your initial setup and come back later.
Managing Secrets Externally
If your organization manages Kubernetes secrets through an external tool (Vault, Sealed Secrets, etc.), you can reference pre-existing secrets instead of putting values directly in the Helm chart.
-
global.existingNudgebeeSecretName— Point to an existing Kubernetes secret that holds core NudgeBee settings (NUDGEBEE_LICENSE,BASE_URL, etc.). When set, the Helm chart uses this secret and you manage the key-value pairs directly.global:
existingNudgebeeSecretName: 'nudgebee-v2'
# Remove or comment out nudgebee_secret when using existingSecret:
# nudgebee_secret:
# NUDGEBEE_LICENSE: YOUR_LICENSE_KEY_HERE -
nudgebee_registry_secret.existingSecretName— Reference a pre-created secret for registry credentials. -
postgresql.auth.existingSecret— Inject an existing secret containing the Postgres password. -
clickhouse.auth.existingSecret— Same usage for ClickHouse. -
rabbitmq.auth.existingPasswordSecret,existingErlangSecret— Same usage for RabbitMQ.
Additional Configuration References
- All Configuration Options — Detailed reference for all environment variables and secrets.
- Full Helm Values Reference — Complete list of every configurable value in the Helm chart.
Troubleshooting Installation Failures
Most Common Issue: Migration Job Timeout
The most common reason for installation failures or timeouts is the post-installation migration job not completing. This usually happens because dependent services (like the database) were not fully ready when Helm triggered the migration.
Fix — re-run Helm upgrade:
helm upgrade nudgebee oci://registry.nudgebee.com/nudgebee \
  -f values.yaml \
  --install \
  --namespace nudgebee \
  --wait \
  --kube-context $KUBE_CONTEXT
This re-triggers the post-install migration and typically resolves the issue.
If you installed a specific version, include --version $CHART_VERSION in the command.
General Troubleshooting Steps
If re-running Helm upgrade does not resolve the issue, check the following:
Check pod status — look for pods in Error, CrashLoopBackOff, or Pending state:
kubectl get pods -n nudgebee -o wide
Check pod logs — examine logs from failing pods, particularly migration-related pods:
kubectl logs <pod-name> -n nudgebee
Inspect a failing pod — get detailed information about why a pod is stuck:
kubectl describe pod <failing-pod-name> -n nudgebee
Review recent events — look for image pull errors, resource issues, or volume problems:
kubectl get events -n nudgebee --sort-by=.lastTimestamp
Uninstall NudgeBee
To completely remove NudgeBee from your cluster:
helm uninstall nudgebee --namespace nudgebee --kube-context $KUBE_CONTEXT
This removes all NudgeBee components and data. Make sure to back up any data you need before uninstalling.
What's Next?
Your NudgeBee server is running. Here is what to do next:
- Install the NudgeBee Agent on each Kubernetes cluster you want to monitor — this is how NudgeBee gets visibility into your workloads.
- Configure Integrations — connect your observability tools, notification channels, and LLM provider to unlock the full platform.
- Explore the Getting Started Guide — see the recommended setup order and what to do after your first login.